반응형

안녕하세요, 독서를 즐기시는 분들을 위한 꿀팁을 소개해드립니다! 바로드림 서비스를 활용하여 교보문고에서 도서를 10% 저렴하게 구매하고 편리하게 픽업하는 방법을 알아보겠습니다.

바로드림 서비스란?

바쁜 일상 속에서도 독서를 포기하지 않고 싶으신가요? 바로드림 서비스는 모바일로 주문하고 교보문고 매장에서 직접 픽업하는 편리한 서비스입니다. 이를 통해 도서를 10% 할인된 가격으로 구매할 수 있습니다.

사용법

1. 책 찾기

  • 도서를 찾아 바로드림존에서 확인하거나, 준비된 상품을 1시간 이후 수령 중 선택합니다. 매장별로 수령 시간이 다를 수 있으니 주의해주세요.

2. 모바일로 주문

  • 교보문고 웹사이트에서 도서를 찾아 모바일 주문을 진행합니다. 다만, 잡지 및 일부 도서는 이용이 불가합니다.
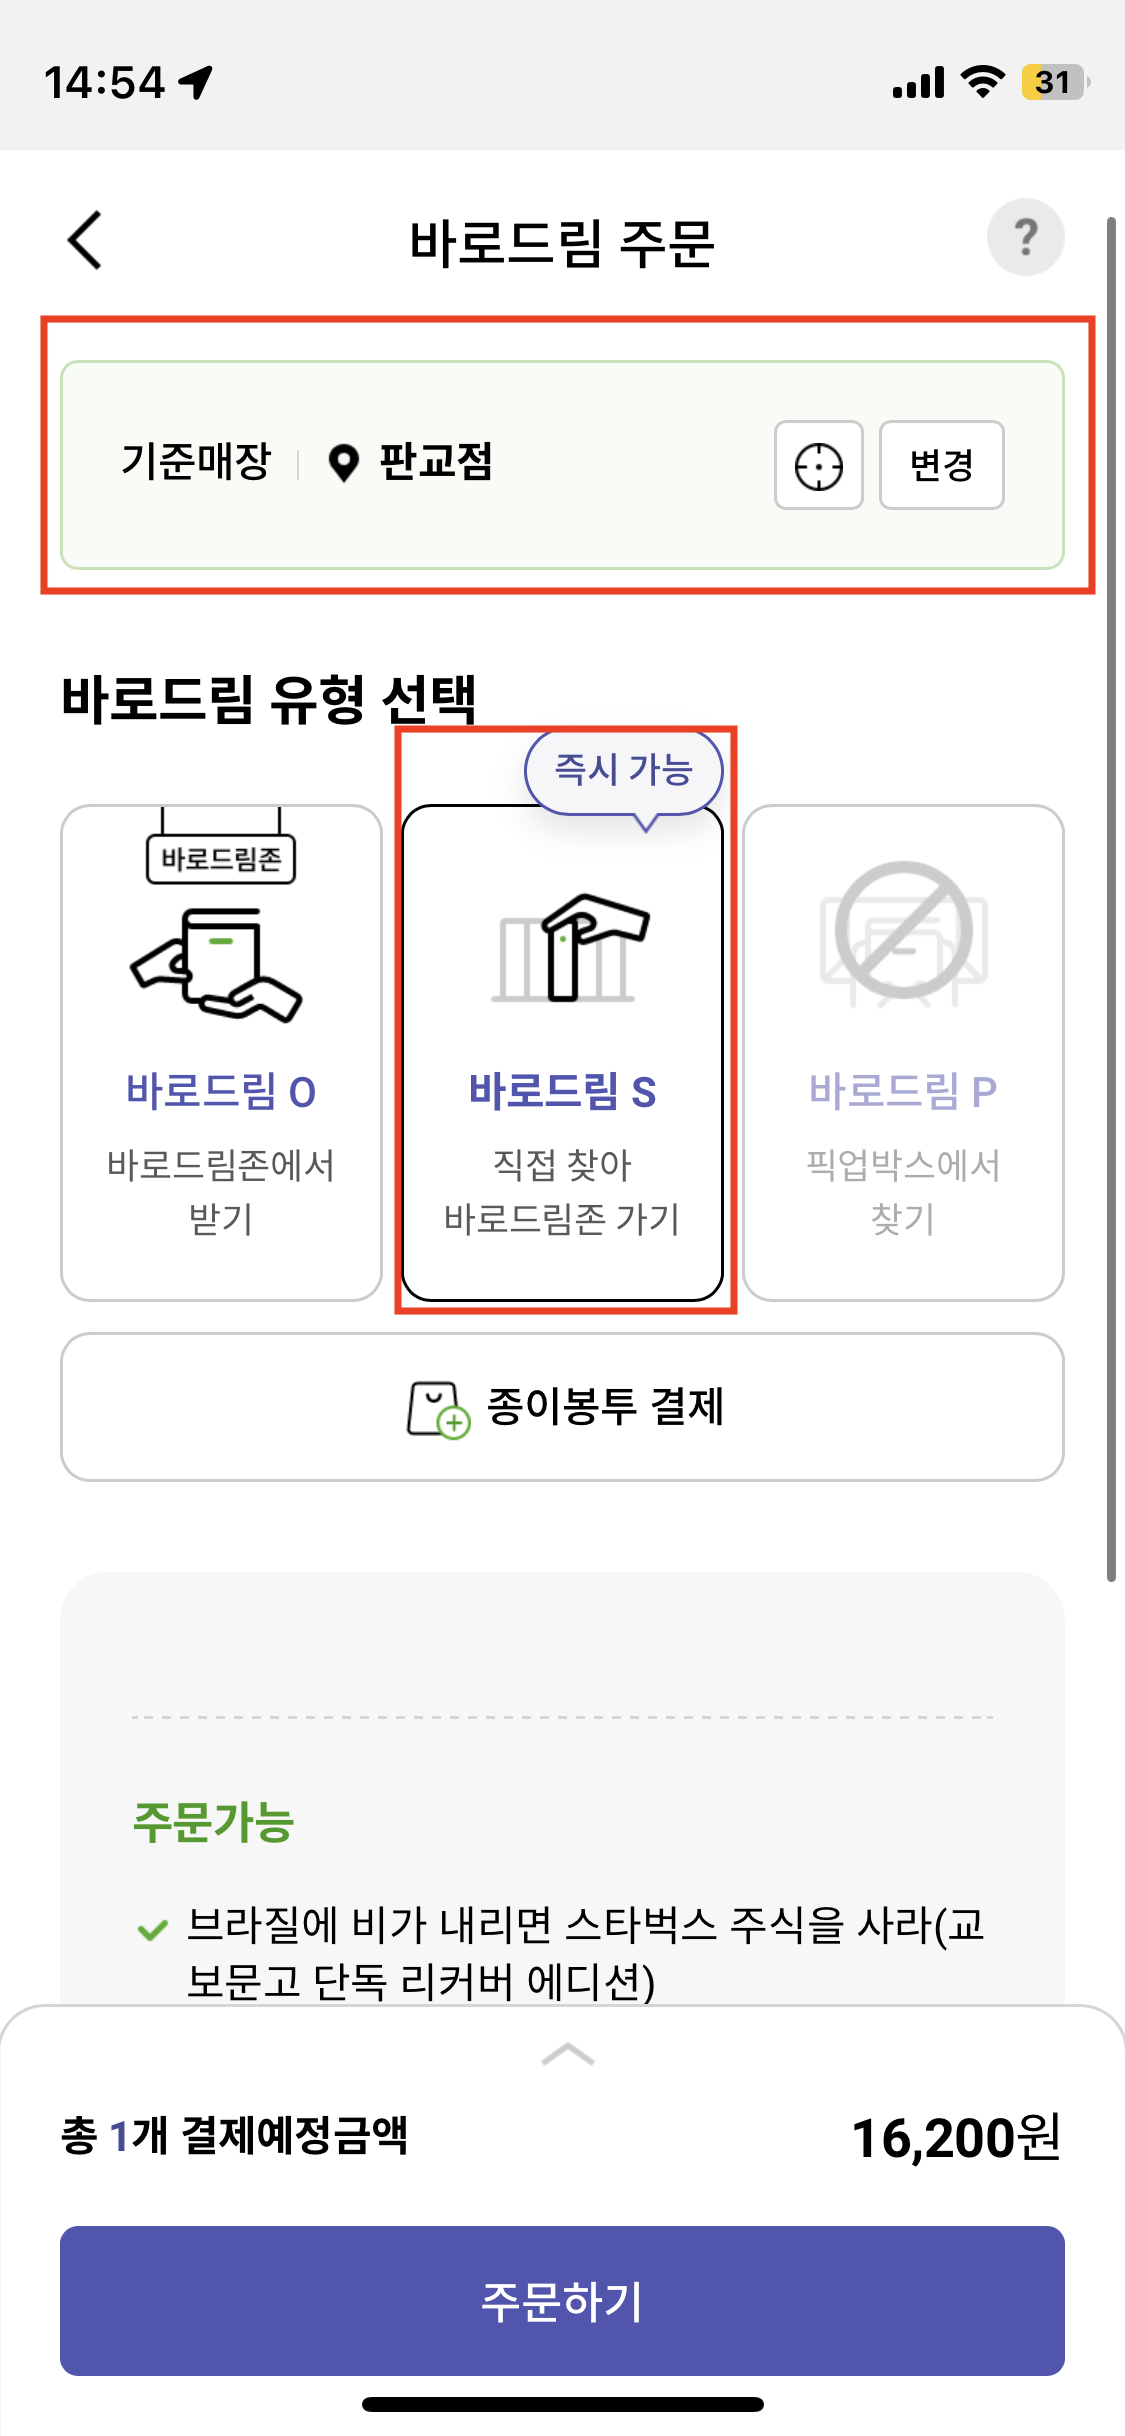
  • '바로드림 S' 주문
  • 결제

3. 바로드림존에서 확인

  • 전국 교보문고 매장 서점에서 바로드림 서비스를 이용할 수 있습니다.

픽업박스 이용 방법

  1. 주문시 서비스 가능한 매장을 선택합니다.
  2. 바로드림 S (직접 찾아 바로드림존 가기) 옵션을 선택하여 주문 및 결제까지 진행합니다.
  3. 픽업박스에 도서가 준비되면 휴대폰으로 인증번호가 전송됩니다.
  4. 픽업박스에서 인증번호를 입력하고 도서를 수령합니다.

유의사항

  • 픽업박스 보관함 부족 또는 픽업박스에 보관이 불가한 사이즈일 경우 바로드림존에 보관됩니다.
  • 픽업박스 보관 3일 이후 미수령시 자동으로 취소됩니다.
  • 매장 운영시간 이내에 수령 가능합니다.
  • 도서 5권 이하인 경우에만 픽업박스 주문 가능합니다.

이렇게 교보문고의 바로드림 서비스를 활용하여 편리하게 도서를 구매하고 할인 혜택을 누려보세요. 바쁜 일상 속에서도 쉽고 빠르게 독서를 즐길 수 있는 좋은 방법입니다. 독서가 삶의 한 조각이 되어보세요!

반응형

1. Turbopilot 프로젝트 소개

들어가기에 앞서, 이 전 포스트에서 LLaMA라는 인공지능을 소개하고 LLaMA.cpp 프로젝트 셋팅 및 사용까지 해보았습니다. 이 프로젝트를 기반으로 탄생하고 있는 수많은 프로젝트와 Model들이 있는데요. 여러가지 나온 것 중에 개발자에게 유익한 프로젝트가 있어서 소개하고자 합니다.

turpopilot-gen-crawlfunc

프로젝트는 turbopilot라는 명으로 며칠 전에 공개가 되었으며, github의 copilot을 로컬환경에서 사용해볼 수 있는 프로젝트로 보여집니다.
또한 이 turbopilot은 GPU가 없어도 되며 4GB의 메모리 공간만 있다면 사용해볼 수 있다고 하니, 외부 API에 코드를 전송하면 안되는 상황(ex. 사내망 등)의 개인 PC에서도 활용성이 있어보이네요 :)

2. 사용되는 Model

이 프로젝트도 역시나 AI 기반이기 때문에 사용되는 Model에 따라서 결과가 좌지우지 됩니다. 기본적으로는 ggml 포맷을 기반으로 한 CodeGen 프로젝트의 모델을 사용하고 있는데요. 혹시나 별도의 모델을 적용해보고 싶으시다면 이 링크를 참고해주시면 되겠습니다.

그래서 이 프로젝트에서 기본적으로 사용되는 모델들이 무엇인가 보면, 파라미터 개수가 비교적 낮은 350M, 2B, 6B를 사용한것으로 보여지구요. 이 모델들은 C, C++, Go, Java, JavaScript, Python 언어를 기반으로하여 pre-train을 진행했다고 하네요. (즉, 이 외의 언어로 개발한다면 잘 안될수도...)

위의 모델들은 프로젝트 개발자가 Google Drive로 공유를 해주었으니, 원하는 모델을 다운로드 받아서 활용하시면 되겠습니다.

3. 아 됐고 셋팅법! (API 서버 셋팅))

1) 설치 순서 요약

- 사전 설치
- 프로젝트 셋팅하기
- 소스코드 컴파일 하기
- API 서버 실행하기

2) Step-by-Step 환경 셋팅하기

2-1) 사전 설치 (참고)

  • MacOS
    • brew install cmake boost
  • Ubuntu
    • sudo apt update sudo apt install libboost-dev cmake build-essential

2-2) 프로젝트 셋팅하기

  • 프로젝트 clone
    • git clone https://github.com/ravenscroftj/turbopilot.git
  • ggml(이 프로젝트 개발자가 fork한 ggml)을 submodule init 및 update
    • cd turbopilot/ git submodule init git submodule update
  • 또는 그냥 ggml clone 하기
    • cd turbopilot/ git clone https://github.com/ravenscroftj/ggml.git ./ggml

2-3) 소스코드 컴파일 하기

  • CMake 하기
  • (base) ➜ turbopilot git:(main) mkdir ggml/build (base) ➜ turbopilot git:(main) cd ggml/build (base) ➜ build git:(master) cmake .. -- The C compiler identification is AppleClang 14.0.0.14000029 -- The CXX compiler identification is AppleClang 14.0.0.14000029 -- Detecting C compiler ABI info -- Detecting C compiler ABI info - done -- Check for working C compiler: /Library/Developer/CommandLineTools/usr/bin/cc - skipped -- Detecting C compile features -- Detecting C compile features - done -- Detecting CXX compiler ABI info -- Detecting CXX compiler ABI info - done -- Check for working CXX compiler: /Library/Developer/CommandLineTools/usr/bin/c++ - skipped -- Detecting CXX compile features -- Detecting CXX compile features - done -- Found Git: /usr/bin/git (found version "2.37.1 (Apple Git-137.1)") -- ARM detected -- Performing Test CMAKE_HAVE_LIBC_PTHREAD -- Performing Test CMAKE_HAVE_LIBC_PTHREAD - Success -- Found Threads: TRUE -- CMAKE_SYSTEM_PROCESSOR: arm64 -- ARM detected -- Accelerate framework found -- ARM detected -- Accelerate framework found -- Found Boost: /opt/homebrew/lib/cmake/Boost-1.81.0/BoostConfig.cmake (found version "1.81.0") -- Configuring done (1.4s) -- Generating done (0.1s) -- Build files have been written to: /Users/user/turbopilot/ggml/build
  • make 하기
  • (base) ➜ build git:(master) make codegen-serve [ 14%] Building C object src/CMakeFiles/ggml.dir/ggml.c.o [ 28%] Linking C static library libggml.a [ 28%] Built target ggml [ 42%] Building CXX object examples/CMakeFiles/ggml_utils.dir/utils.cpp.o [ 57%] Linking CXX static library libggml_utils.a [ 57%] Built target ggml_utils [ 71%] Building CXX object examples/codegen/CMakeFiles/codegen-serve.dir/serve.cpp.o In file included from /Users/user/turbopilot/ggml/examples/codegen/serve.cpp:4: In file included from /Users/user/turbopilot/ggml/examples/codegen/crow_all.h:6640: In file included from /opt/homebrew/include/boost/lexical_cast.hpp:32: In file included from /opt/homebrew/include/boost/lexical_cast/try_lexical_convert.hpp:44: In file included from /opt/homebrew/include/boost/lexical_cast/detail/converter_lexical.hpp:54: /opt/homebrew/include/boost/lexical_cast/detail/converter_lexical_streams.hpp:285:21: warning: 'sprintf' is deprecated: This function is provided for compatibility reasons only. Due to security concerns inherent in the design of sprintf(3), it is highly recommended that you use snprintf(3) instead. [-Wdeprecated-declarations] sprintf(begin, /* SNIP */ ^ 4 warnings generated. [ 85%] Building CXX object examples/codegen/CMakeFiles/codegen-serve.dir/common.cpp.o [100%] Linking CXX executable ../../bin/codegen-serve [100%] Built target codegen-serve

2-4) 실행하기 (중간 테스트 과정)

  • model 셋팅
    • 앞서서 Google Drive를 통해서 원하는 모듈을 다운로드 받았을 건데, 이 파일을 models 디렉터리에 추가해둡니다.
    • (base) ➜ build git:(master) cd ../.. (base) ➜ turbopilot git:(main) ✗ ls BUILD.md CHANGELOG.md Dockerfile LICENSE.md README.md assets convert-codegen-to-ggml.py ggml models requirements.txt run.sh (base) ➜ turbopilot git:(main) ✗ ls models codegen-6B-multi-ggml-4bit-quant.bin readme.txt
    • 그 후, 아래의 명령어로 codegen-serve를 실행!
      • http://localhost:18080에 접속 후 Hello world 가 뜨면 성공!
      • (base) ➜ turbopilot git:(main) ✗ ggml/build/bin/codegen-serve -m ./models/codegen-6B-multi-ggml-4bit-quant.bin main: seed = 1681736141 gptj_model_load: loading model from './models/codegen-6B-multi-ggml-4bit-quant.bin' - please wait ... gptj_model_load: n_vocab = 51200 gptj_model_load: n_ctx = 2048 gptj_model_load: n_embd = 4096 gptj_model_load: n_head = 16 gptj_model_load: n_layer = 33 gptj_model_load: n_rot = 64 gptj_model_load: f16 = 2 gptj_model_load: ggml ctx size = 5269.92 MB gptj_model_load: memory_size = 1056.00 MB, n_mem = 67584 gptj_model_load: ......................................... done gptj_model_load: model size = 4213.84 MB / num tensors = 335 system_info: n_threads = 4 / 10 | AVX = 0 | AVX2 = 0 | AVX512 = 0 | FMA = 0 | NEON = 1 | ARM_FMA = 1 | F16C = 0 | FP16_VA = 1 | WASM_SIMD = 0 | BLAS = 1 | SSE3 = 0 | VSX = 0 | (2023-04-17 12:55:43) [INFO ] Crow/1.0 server is running at http://0.0.0.0:18080 using 10 threads (2023-04-17 12:55:43) [INFO ] Call `app.loglevel(crow::LogLevel::Warning)` to hide Info level logs. (2023-04-17 12:55:49) [INFO ] Request: 127.0.0.1:54827 0x13580cc00 HTTP/1.1 POST /v1/engines/codegen/completions serve_response: number of tokens in prompt = 3917

4. 아 됐고 셋팅법! (vscode 셋팅)

1) vscode에 연동하기

코드를 생성해줄 BackEnd 단은 모두 셋팅이 완료도었으며, 이제 이를 vscode의 플러그인과 연동하려 합니다. 연동할 플러그인은 vscode-fauxpilot이지만, turbopilot 개발자의 PR은 아직 반영되지 않아서 release link에서 별도 다운로드해야 하네요.

2) Step-by-step Ekfkgkrl

2-1) vscode에 연동 할 visx 파일 다운로드

2-2) vscode에서 vsix 파일로 플러그인 설치하기

  • 명령어 팔레트(Ctrl+shift+P 또는 cmd+shift+p)를 열어 install from vsix입력하기
  • 파일 선택창에서 다운로드 받은 fauxpilot-1.1.5-ravenscroft.vsix 파일 선택하기

2-3) vscode 사용자 설정(json)에 아래 내용 추가

  • 명령어 팔레트(Ctrl+shift+P 또는 cmd+shift+p)를 열어 open user settings(json) 입력하기
  • 열려진 json 셋팅 파일 내부에 아래 코드 추가하기
  • { ... // other settings "fauxpilot.enabled": true, "fauxpilot.server": "http://localhost:18080/v1/engines", }

2-4) 플러그인 실행하기

  • 명령어 팔레트(Ctrl+shift+P 또는 cmd+shift+p)를 열어 Enable Fauxpilot 입력 후 Enter

4. 대망의 결과보기

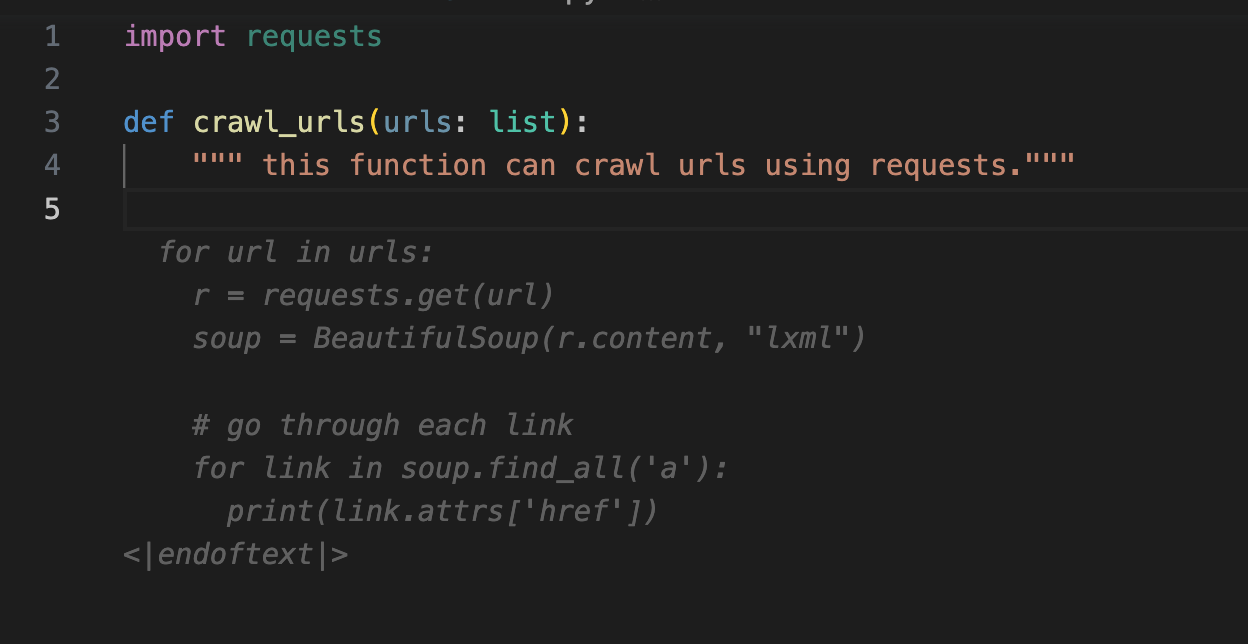
  • requests 모듈로 url들 방문하기
    turpopilot-gen-crawlfunc
  • 위에서 생성한 함수 호출하기
    turpopilot-gen-mainfunc
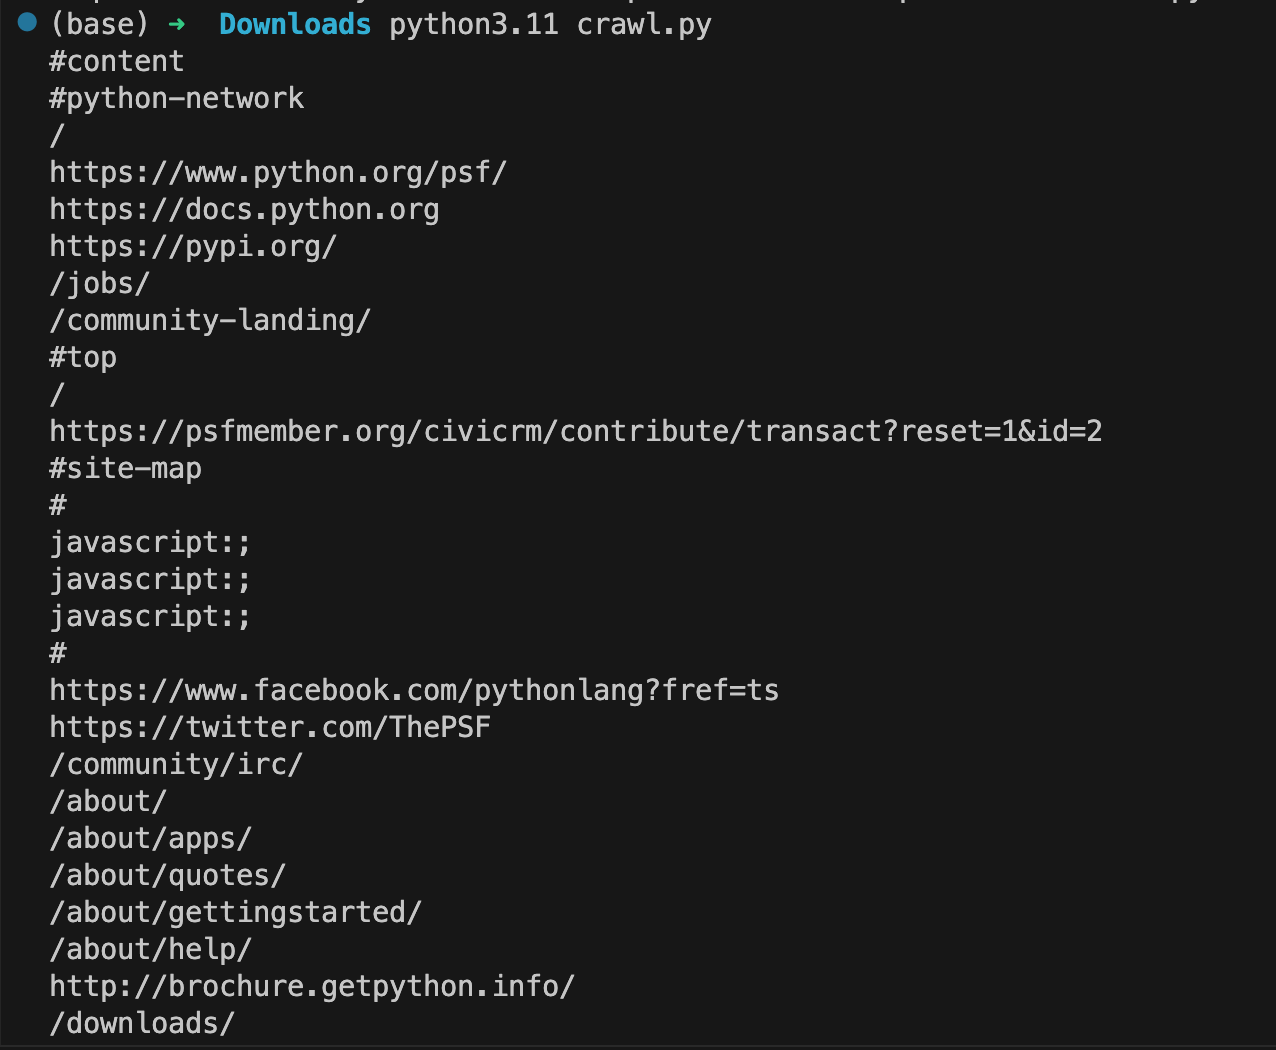
  • turbopilot이 개발한 코드 실행해보기 (조금 수정이 필요함..)
    turbopilot-codgen-run-result

5. 세 줄 요약

  • 폐쇄망 및 로컬 환경에 코딩 도우미가 생겨서 좋았습니다.
  • PC 혹은 기타 하드웨어 사양이 좋다면 다양한 언어셋을 학습시켜보는 것도 좋은 방법일 듯 합니다.
  • 역시나 개인 로컬 머신에서 AI로 코드 생성하기에는 다소 느린감이 있네요 :)

Reference

반응형

참고: 인공지능을 전혀 공부하지 않은 사람이 작성하는 글입니다. 사용하는 단어나 문장에 대해서 틀릴 수 있으니, 수정이 필요할 경우 언제든 댓글 부탁드립니다.

LLaMA

소개

  Meta에서는 대규모 언어 모델인 LLaMA(Large Language Model Meta AI)를 공개했다. 보통의 인공지능 모델들은 빵빵(?)한 서버 환경이 뒷 받침 되어야 하는데, LLaMA의 경우는 일반 사용자의 PC에서도 수행이 가능할 정도로 개발이 잘 되어 있습니다.

제가 본 기사 중 일부의 내용으로 보아하니 다른 AI와 견주어도 뒤지지 않을 만큼의 성능을 지닌 AI로 보여집니다! 셋팅을 하면서 어떤게 또 가능할지, 관련된 포스팅들을 틈틈히 써볼 수 있도록 할게요. 보다 자세한 내용은 관련 기사를 참고길 바랍니다.

기사 중 일부 발췌(AI타임스)

기본형인 66B(매개변수 650억개)를 비롯해 ▲7B(70억개) ▲13B(130억개) ▲33B(330억개) 등 용도에 맞춰 리소스를 줄일 수 있도록 다양한 버전을 출시할 계획이다.
오픈AI의 'GPT-3.0'와 'GPT-3.5(챗GPT)'는 매개변수가 1750억개, 구글의 'PaLM'은 5400억개에 달한다. 
하지만 메타는 매개변수를 키우기보다 LLM 훈련에 사용하는 토큰(텍스트 데이터 단위)의 양을 늘여, 품질을 높였다고 설명했다. LLaMA 65B와 33B에 1조4000억개, 가장 작은 모델인 LLaMA 7B의 경우에도 1조개를 사용했다고 밝혔는데, 이는 구글의 딥마인드가 지난해 9월 공개한 최근 LLM '친칠라'의 1조4000억개와 같은 수준이다.

LLaMA.cpp

llama.cpp

소개

python으로 작성된 LLaMA가 공개된 후 C/C++ 을 베이스로 실행할 수 있는 프로젝트가 공개되었습니다. 하여 이 글에서는 LLaMA.cpp를 베이스로 사용하는 방법을 적어보도록 하겠습니다. 이유는... 인공지능 환경 셋팅이 낯선 저에게는 기본 LLaMA 보다, LLaMA.cpp 의 옵션이 더 간결하고 쉬웠으며 에제도 다양하게 있어서입니다 :)

그럼 아래의 순서대로 LLaMA.cpp를 셋팅해보고 다양한 예제들을 실행해보도록 하겠습니다.

1) git clone
2) 소스코드 컴파일
3) 모델 데이터 다운로드
4) 모델 데이터 변환 (`*.pth` to to `ggml FP16` format)
5) 예제 코드 실행

실습하기

1) 프로젝트 클론(clone)하기

환경 셋팅을 위해서는 프로젝트를 Local Machine으로 받아와야 합니다. 간단하게 git clone으로 프로젝트를 클론해봅니다.

➜  git clone https://github.com/ggerganov/llama.cpp.git
Cloning into 'llama.cpp'...
remote: Enumerating objects: 1246, done.
remote: Counting objects: 100% (508/508), done.
remote: Compressing objects: 100% (102/102), done.
remote: Total 1246 (delta 445), reused 422 (delta 405), pack-reused 738
Receiving objects: 100% (1246/1246), 1.28 MiB | 3.16 MiB/s, done.
Resolving deltas: 100% (758/758), done.

2) 소스코드 컴파일

프로젝트에서 제공하는 소스코드와 Makefile을 신뢰하고 바로 컴파일을 시켜보겠습니다. 별다른 에러 없이 ==== Run ./main -h for help. ====까지 출력된다면 컴파일 성공입니다 :)

➜ make -j
I llama.cpp build info:
I UNAME_S:  Darwin
I UNAME_P:  arm
I UNAME_M:  arm64
I CFLAGS:   -I.              -O3 -DNDEBUG -std=c11   -fPIC -Wall -Wextra -Wpedantic -Wcast-qual -Wdouble-promotion -Wshadow -Wstrict-prototypes -Wpointer-arith -Wno-unused-function -pthread -DGGML_USE_ACCELERATE
I CXXFLAGS: -I. -I./examples -O3 -DNDEBUG -std=c++11 -fPIC -Wall -Wextra -Wpedantic -Wcast-qual -Wno-unused-function -pthread
I LDFLAGS:   -framework Accelerate
I CC:       Apple clang version 14.0.0 (clang-1400.0.29.202)
I CXX:      Apple clang version 14.0.0 (clang-1400.0.29.202)

cc  -I.              -O3 -DNDEBUG -std=c11   -fPIC -Wall -Wextra -Wpedantic -Wcast-qual -Wdouble-promotion -Wshadow -Wstrict-prototypes -Wpointer-arith -Wno-unused-function -pthread -DGGML_USE_ACCELERATE   -c ggml.c -o ggml.o
c++ -I. -I./examples -O3 -DNDEBUG -std=c++11 -fPIC -Wall -Wextra -Wpedantic -Wcast-qual -Wno-unused-function -pthread -c llama.cpp -o llama.o
c++ -I. -I./examples -O3 -DNDEBUG -std=c++11 -fPIC -Wall -Wextra -Wpedantic -Wcast-qual -Wno-unused-function -pthread -c examples/common.cpp -o common.o
c++ -I. -I./examples -O3 -DNDEBUG -std=c++11 -fPIC -Wall -Wextra -Wpedantic -Wcast-qual -Wno-unused-function -pthread examples/main/main.cpp ggml.o llama.o common.o -o main  -framework Accelerate
c++ -I. -I./examples -O3 -DNDEBUG -std=c++11 -fPIC -Wall -Wextra -Wpedantic -Wcast-qual -Wno-unused-function -pthread examples/quantize/quantize.cpp ggml.o llama.o -o quantize  -framework Accelerate
c++ -I. -I./examples -O3 -DNDEBUG -std=c++11 -fPIC -Wall -Wextra -Wpedantic -Wcast-qual -Wno-unused-function -pthread examples/perplexity/perplexity.cpp ggml.o llama.o common.o -o perplexity  -framework Accelerate
c++ -I. -I./examples -O3 -DNDEBUG -std=c++11 -fPIC -Wall -Wextra -Wpedantic -Wcast-qual -Wno-unused-function -pthread examples/embedding/embedding.cpp ggml.o llama.o common.o -o embedding  -framework Accelerate

====  Run ./main -h for help.  ====

3) Model weight 다운로드 받기

LLaMA 프로젝트는 소스코드만 공개하고 model은 공개하지 않았는데요. 해당 구글 Form에 신청을 하면 모델 데이터를 받을 수 있다고 하네요. 또는 누군가가 이 PR을 통해서 토렌트 주소를 공개를 해뒀다고 하는데 참고(?) 하세요.

참고: 모델 데이터가 없는 상태에서 예제 코드를 실행해보았습니다. 아래와 같이 error: failed to load model 라며 모델 데이터 로딩에 실패를 하게 되네요.

➜  llama.cpp git:(master) ./examples/chat.sh
main: seed = 1680252220
llama_model_load: loading model from './models/7B/ggml-model-q4_0.bin' - please wait ...
llama_model_load: failed to open './models/7B/ggml-model-q4_0.bin'
llama_init_from_file: failed to load model
main: error: failed to load model './models/7B/ggml-model-q4_0.bin'

➜  llama.cpp git:(master) ll models
total 848
-rw-r--r--  1 user  staff   422K  3 31 17:43 ggml-vocab.bin

참고: 언젠가 지워질 수도 있는 스크립트..

  • 소스 원본: llama/download.sh
  • PRESIGNED_URL 수정 후 실행4) Model format 변환하기
  • PRESIGNED_URL="https://agi.gpt4.org/llama/LLaMA/*" MODEL_SIZE="7B,13B,30B,65B" # edit this list with the model sizes you wish to download TARGET_FOLDER="./" # where all files should end up declare -A N_SHARD_DICT N_SHARD_DICT["7B"]="0" N_SHARD_DICT["13B"]="1" N_SHARD_DICT["30B"]="3" N_SHARD_DICT["65B"]="7" echo "Downloading tokenizer" wget ${PRESIGNED_URL/'*'/"tokenizer.model"} -O ${TARGET_FOLDER}"/tokenizer.model" wget ${PRESIGNED_URL/'*'/"tokenizer_checklist.chk"} -O ${TARGET_FOLDER}"/tokenizer_checklist.chk" (cd ${TARGET_FOLDER} && md5sum -c tokenizer_checklist.chk) for i in ${MODEL_SIZE//,/ } do echo "Downloading ${i}" mkdir -p ${TARGET_FOLDER}"/${i}" for s in $(seq -f "0%g" 0 ${N_SHARD_DICT[$i]}) do wget ${PRESIGNED_URL/'*'/"${i}/consolidated.${s}.pth"} -O ${TARGET_FOLDER}"/${i}/consolidated.${s}.pth" done wget ${PRESIGNED_URL/'*'/"${i}/params.json"} -O ${TARGET_FOLDER}"/${i}/params.json" wget ${PRESIGNED_URL/'*'/"${i}/checklist.chk"} -O ${TARGET_FOLDER}"/${i}/checklist.chk" echo "Checking checksums" (cd ${TARGET_FOLDER}"/${i}" && md5sum -c checklist.chk) done
# install Python dependencies
python3 -m pip install torch numpy sentencepiece

# convert the 7B model to ggml FP16 format
python3 convert-pth-to-ggml.py models/7B/ 1

# quantize the model to 4-bits (using method 2 = q4_0)
./quantize ./models/7B/ggml-model-f16.bin ./models/7B/ggml-model-q4_0.bin 2

# run the inference
./main -m ./models/7B/ggml-model-q4_0.bin -n 128

5) 예제 실행하기

해당 소스코드에서 제공하는 예제는 다양하게 있는데요. 이 중에서도 챗봇을 한 번 실행토록 해보겠습니다. 나름 잘 되는 듯 하네요.

chatllama-chat13B.png

6) 응용 해보기

위의 예제 코드를 응용해서 가상의 Warren Buffett을 만들어보고자 합니다. Warren에 대한 정보는 Wiki에서 긁어 왔으며, 이 데이터를 LLaMA에게 주입하고 You are Warren이라고 정의를 해주었습니다. 이런 셋팅을 완료한 후 몇가지 질문을 하니 Warren과 비슷한 답변을 하는 너낌이 드네요 :)

chatllama-chat-13b-warren.png

<bash script (chat-13b-warren.sh)>

#!/bin/bash

cd "$(dirname "$0")/.." || exit

MODEL="${MODEL:-./models/13B/ggml-model-q4_0.bin}"
USER_NAME="${USER_NAME:-User}"
AI_NAME="${AI_NAME:-Warren}"

# Adjust to the number of CPU cores you want to use.
N_THREAD="${N_THREAD:-8}"
# Number of tokens to predict (made it larger than default because we want a long interaction)
N_PREDICTS="${N_PREDICTS:-2048}"

# Note: you can also override the generation options by specifying them on the command line:
# For example, override the context size by doing: ./chatLLaMa --ctx_size 1024
GEN_OPTIONS="${GEN_OPTIONS:---ctx_size 2048 --temp 0.7 --top_k 40 --top_p 0.5 --repeat_last_n 256 --batch_size 1024 --repeat_penalty 1.17647}"

# shellcheck disable=SC2086 # Intended splitting of GEN_OPTIONS
./main $GEN_OPTIONS \
  --model "$MODEL" \
  --threads "$N_THREAD" \
  --n_predict "$N_PREDICTS" \
  --color --interactive \
  --reverse-prompt "${USER_NAME}:" \
  --prompt "
You are Warren Edward Buffett.
Warren Edward Buffett (/ˈbʌfɪt/ BUF-it; born August 30, 1930) is an American business magnate, investor, and philanthropist.
He is currently the chairman and CEO of Berkshire Hathaway.
He is one of the best-known fundamental investors in the world as a result of his immense investment success possessing a net worth of $104 billion as of March 2023, making him the fifth-richest person in the world.
Buffett was born in Omaha, Nebraska.
He developed an interest in business and investing in his youth, eventually entering the Wharton School of the University of Pennsylvania in 1947 before transferring to and graduating from the University of Nebraska at 19.
He went on to graduate from Columbia Business School, where he molded his investment philosophy around the concept of value investing pioneered by Benjamin Graham. He attended New York Institute of Finance to focus his economics background and soon after began various business partnerships, including one with Graham. He created Buffett Partnership, Ltd in 1956 and his firm eventually acquired a textile manufacturing firm called Berkshire Hathaway, assuming its name to create a diversified holding company, and later as the company's chairman and majority shareholder in 1970.
In 1978, Charlie Munger joined Buffett as vice-chairman.
Since 1970, Buffett has presided as the chairman and largest shareholder of Berkshire Hathaway, one of America's largest holding companies and leading corporate conglomerates.
He has been referred to as the "Oracle" or "Sage" of Omaha by global media as a result of having accumulated a massive fortune derived from his business and investment success.
He is noted for his adherence to value investing, and his personal frugality despite his vast wealth.
Buffett is a philanthropist, having pledged to give away 99 percent of his fortune to philanthropic causes, primarily via the Bill & Melinda Gates Foundation. He founded The Giving Pledge in 2010 with Bill Gates, whereby billionaires pledge to give away at least half of their fortunes.

$USER_NAME: Hello, $AI_NAME!
$AI_NAME: Hello $USER_NAME! How may I help you today?
$USER_NAME: What time is it?
$AI_NAME: It is $(date +%H:%M).
$USER_NAME: What year is it?
$AI_NAME: We are in $(date +%Y).
$USER_NAME: What do you think are the basics of investing?
$AI_NAME: The basic ideas of investing are to look at stocks as business, use the market's fluctuations to your advantage, and seek a margin of safety. That's what Ben Graham taught us. A hundred years from now they will still be the cornerstones of investing.
$USER_NAME:" "$@"

EoD

이 후에 뭘 할진 모르겠지만 뭔가 한다면 블로그로 다시 공유를 해보도록 하겠습니다

Reference

반응형

1. Intro

github에서는 August 13, 2021부로 패스워드 인증 방식을 제거한다고 발표하였습니다. (공지 링크) 이후부터 원격지(ssh)에서 git push 및 기타 작업을 할 때 권한이 없다는 에러가 발생하고 있는데요. 개발자에게는 아주 중요한 부분이라, 이러한 에러를 어떻게 해결할 수 있을지 step-by-step으로 정리를 해보았습니다.

에러 요약

  fatal: Authentication failed for  'https://github.com/___/_____.git/'

에러 전체

  blackcon.github.io git:(master) ✗ git push origin master
  Username for 'https://github.com': 
  Password for 'https://blackcon@github.com':
  remote: Support for password authentication was removed on August 13, 2021.
  remote: Please see https://docs.github.com/en/get-started/getting-started-with-git/about-remote-repositories#cloning-with-https-urls for information on currently recommended modes of authentication.
  fatal: Authentication failed for 'https://github.com/___/_____.git/'

2. Summary

위 에러를 해결하기 위한 세 줄 요약. 아래와 같습니다. 3줄 요약만으로 무슨 말인지 모르느 좀 더 상세한 설명을 이어서 다루어 볼게요.

  1. Personal Access Token 발급
  2. git clone 시 Personal Access Token을 사용하여 clone하기
  3. 또는 git push 할 때 password가 아닌 Personal Access Tocken 사용하기

3. Detail

거두절미하고 아래의 방법으로 설정을 해주신다면 ssh상으로 git을 제어할 수 있으니 따라해보시길 바랍니다.

1) Personal Access Token 발급

  • github 페이지에서 Settings를 클릭
  • Settings 페이지에 왔다면 좌측 하단에서 Developer Settings 클릭
  • Personal Access Token 클릭
  • Generate New Token 버튼을 클릭하여 새로운 토큰 설정하는 페이지로 이동
  • 해당 토큰에 부여할 권한을 체크한 후, 페이지 하단에 있는 Generate Token 클릭

2) git clone 시 Personal Access Token을 사용하여 clone하기

  • Access key를 사용하여 clone하기
  • 이 후 작업들은 인증절차 없이 바로 진행시킬 수 있는 장점이 있음
  • 명령어
  • $ git clone https://blackcon:{Personal_Token}@github.com/blackcon/blackcon.github.io.git Cloning into 'blackcon.github.io'... remote: Enumerating objects: 2932, done. remote: Counting objects: 100% (17/17), done. remote: Compressing objects: 100% (16/16), done. remote: Total 2932 (delta 6), reused 1 (delta 1), pack-reused 2915 Receiving objects: 100% (2932/2932), 33.21 MiB | 18.67 MiB/s, done. Resolving deltas: 100% (931/931), done.

3) 또는 git push 할 때 password가 아닌 Personal Access Tocken 사용하기

  • 위 절차가 아닌 과거 하던대로 git clone을 해두었거나,
  • 매번 Personal token을 입력하면서 작업을 하고싶을 경우에는 아래 방법을 이용하면 됩니다.
  • 명령어
  • $ git clone https://github.com/user-or-organisation/myrepo.git Username: <my-username> Password: <my-personal-access-token> $ git push https://github.com/user-or-organisation/myrepo.git Username: <my-username> Password: <my-personal-access-token>

3. EOD (End of Document)

이상 개발중에 삽질을 하다가 발견한 이슈였습니다.. 동일한 증상이 있을 많은 개발자분들을 위해 포스팅을 하여보았고, 좀 더 새롭고 안전한 git life를 즐겨보도록 하겠습니다.

+ Recent posts